ADDITIONAL SERVICES
WPQ
Welder Performance Qualification
TRISPEC has the ability to write procedures, and test and qualify welders on a variety of samples with the use of tensile pulls, bend tests and ultrasonics whether on-site or at the office. Our CWI's can also provide oversight of the welder to ensure all practices and procedures are followed according to your company's requirements.


NACE
Coating Inspection
Our inspectors are responsible for performing and documenting basic and non-destructive inspections of liquid coatings applied by brush, roller or spray to steel surfaces when working in a shop or field setting. NACE is an internationally recognized organization that provides certified training to a variety of industries. All of our coating inspectors combine NACE certification alongside CWI certification to ensure top-quality oversight on any size project.


MFL
Magnetic Flux Leakage
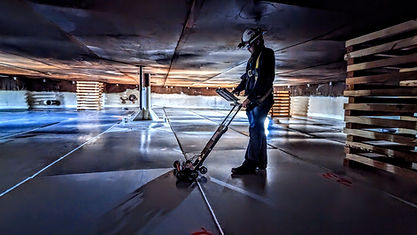
MFL uses powerful magnets to magnetize the conductive material that's being tested. Where there are corrosion or material loss defects, the magnetic field will leak from the steel. MFL probes incorporate a magnetic detector placed between the poles of the magnet where it can detect the leakage field. During inspection, a magnetic "circuit" forms between the part and the probe. The magnetic field induced in the part saturates it until it can no longer hold any more flux. The flux overflows and leaks out of the pipe wall and strategically placed sensors can accurately measure the three-dimensional vector of the leakage field.

Vacuum Box
Leak Testing
Vacuum Box testing utilizes a bubble-leak method to locate leaks in lap welds, butt welds, shell to annular welds, piping systems, pressure vessels, tank bottoms, and seamed pipe in pipelines. A vacuum box and a compressor create a high or low pressure vacuum while a detergent solution is applied to the test area.


PMI
Positive Material Identification
PMI (Positive Material Identification) testing is a process used to determine the composition of a material, usually a metal or alloy, to ensure it meets the required specifications. This technique is particularly important in industries like manufacturing, construction, aerospace, and oil and gas, where the material's properties need to match exact standards for safety, performance, and regulatory compliance.
PMI testing uses various methods, most commonly X-ray fluorescence (XRF) or optical emission spectrometry (OES), to analyze the material's elemental composition. These methods are fast and non-destructive, meaning the material can be tested without altering or damaging it.
Key points about PMI testing:
-
Non-destructive: The material remains intact after testing.
-
Quick results: The testing can be done on-site, providing fast feedback on material identification.
-
Accuracy: Ensures the correct material is being used for critical applications, reducing the risk of failure or safety hazards.
-
Regulatory compliance: Ensures materials meet industry standards or specifications.
Hardness
Material Hardness Testing
Material hardness testing is a process used to measure the resistance of a material to deformation, indentation, or scratching. Hardness is an important property because it often correlates with other material properties such as strength, wear resistance, and ductility. Various testing methods can be used, depending on the material and application.
-
Brinell Hardness Test (Brinell Hardness Number (BHN) is calculated from the diameter of the indentation.)
-
Rockwell Hardness Test (The Rockwell scale (e.g., HRB, HRC) depending on the type of indenter and load used.)
-
Vickers Hardness Test (Vickers Hardness Number (VHN) is calculated based on the area of the indentation.)
Confined Space
Entry Attendant
-
Monitoring Entry and Exit: Ensuring workers enter and exit the confined space safely and verifying that the area is safe for entry before work begins.
-
Constant Communication: Maintaining contact with workers inside the confined space, using radios or other communication methods, to monitor their safety and be alerted in case of emergency.
-
Alerting Emergency Services: If a hazardous situation arises (e.g., if a worker is injured or a hazardous atmosphere is detected), the attendant must immediately alert emergency response personnel.
-
Ensuring Safety Equipment: Making sure that the workers inside the confined space have the required personal protective equipment (PPE) and that ventilation, harnesses, and other safety gear are properly set up.
-
Identifying Hazards: Recognizing potential hazards, such as low oxygen levels, toxic gases, or other environmental risks, and stopping the work if conditions become unsafe.
-
Monitoring Environmental Conditions: Keeping track of factors such as atmospheric hazards (e.g., oxygen deficiency, toxic gases) and environmental conditions, including air quality and ventilation.
-
Pre-Entry Procedures: Assisting in conducting a hazard assessment and verifying that proper permits and preparations are in place before anyone enters the confined space.
-
Initiating Rescue Operations: In case of an emergency, the attendant is responsible for starting the rescue process, contacting rescue teams, and providing essential details about the situation.
Delta Ferrite
Delta ferrite testing is the process of measuring the amount of delta ferrite (δ-ferrite) present in a material, typically in stainless steels and welds. This testing is crucial in industries like aerospace, nuclear, and petrochemical, where the right ferrite content ensures strength, corrosion resistance, and weldability.
-
Prevents Cracking: Ensures welds have enough ferrite to resist hot cracking.
-
Maintains Strength: Too much ferrite can weaken materials at high temperatures.
-
Corrosion Resistance: Helps balance corrosion performance in stainless steels.
-
Ensures Quality Control: Confirms that materials meet industry specifications.

-
Interpreting Results
-
Typical Ferrite Content in Austenitic Stainless Steels: 3% – 10% (FN 3–10)
-
Too Low (<3 FN): Increased risk of hot cracking in welds.
-
Too High (>10 FN): Can reduce toughness and corrosion resistance.

-
Common Methods of Delta Ferrite Testing
-
Ferrite Number (FN) Measurement (Non-Destructive)
-
Magnetic Induction Method: Uses a Ferritescope or Magna Gage to measure magnetic permeability.
-
Feritscope (Fischer Feritscope FMP30, etc.): A handheld device that gives a direct ferrite content reading in Ferrite Number (FN).
-
Electromagnetic Induction: Measures magnetic response in a non-destructive way.
-
Metallographic Examination (Destructive)
-
Optical Microscopy: A polished sample is etched and examined under a microscope.
-
Image Analysis: Software is used to quantify delta ferrite content from a microstructure image.
-
X-Ray Diffraction (XRD)
-
More precise but less commonly used due to its complexity.


